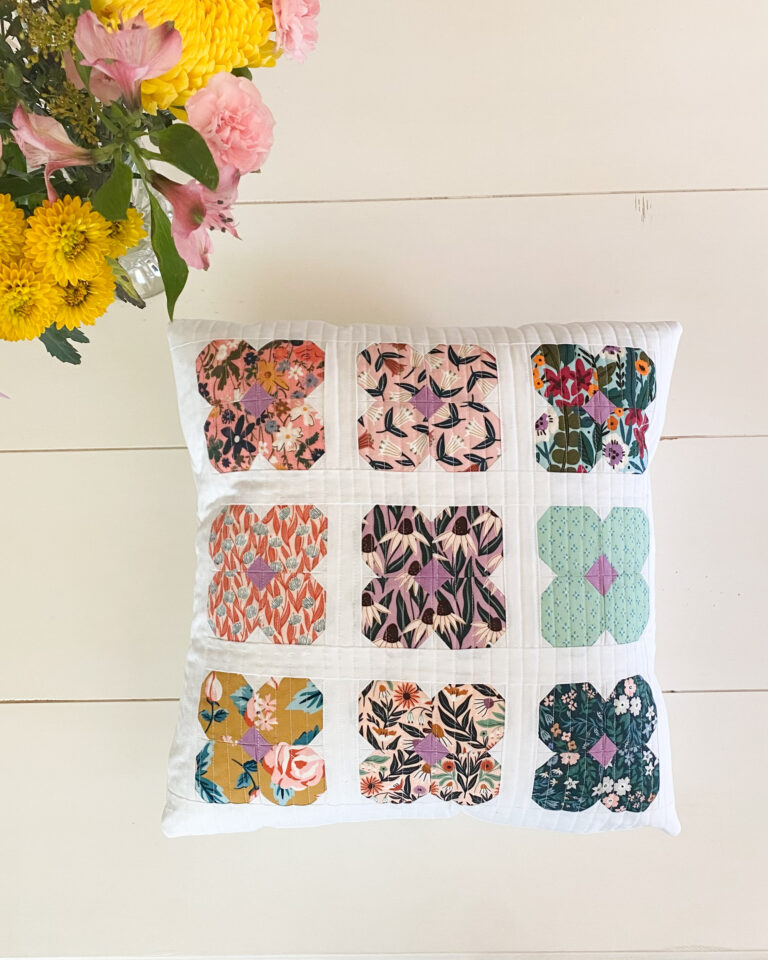
How to Sew a Quilted Envelope Pillow Cover
Pillow covers are some of the most versatile and fun things to make for your home. As a first time home owner many moons ago, I taught myself how to sew so that I could make pillows and drapes to decorate our home and give it my handmade touch. Back then I sewed easy pillow covers with just one piece of fabric for the front, and an easy to sew envelope style back. Today we’re taking it up a notch, and we’ll turn some snowball blocks into a pillow cover.
Gather up your supplies, and let’s get started!

A Few of my favorite things for Quilting
- Bernina 440QE sewing machine
- Sewing machine needles – SCHMETZ Universal (130/705 H) – Size 80/12
- Iron – I use a Panasonic cordless iron
- Rotary Cutter – OLFA 45mm Ergonomic Rotary Cutter
- Cutting Mat – Creative Grids, or OLFA Self-Healing Cutting Mat at least 18″ x 24″
- Rotating Cutting Mat (optional, but I love mine!) – OLFA 12″ x 12″ Rotating Cutting Mat
- Quilt rulers in various sizes, Creative Grids 2 1/2″ x 12″ or 1 1/2″x6″, 6 1/2″ x 24 1/2″
- Glass head sewing pins – Dritz 61 Glass Head Pins, Extra Fine, 1-3/8-Inch (250-Count)
- Thread – I use Aurifil 50wt thread – Light Beige the most often, and Gutermann thread
- Seam ripper
- Pencil/pen
- Scissors – I love KAI Scissors 7230 9 in Shears, Stainless Steel, and their small embroidery scissors Kai 5130DC: 5-inch Double Curved Scissors. And my favorite thread cutter lately is the BladeSaver Thread Cutter (such a clever and useful way to re-purpose dull rotary blades)
- Cotton Batting – I use mostly Warm Company’s Warm and White or natural
- Basting safety pins – Dritz curved quilting safety pins
- Paula Jean Creations Kwik Klip tool
- Quilting Gloves – Machingers
- Binding Clips – Clover Wonder Clips

Fabric Requirements
Below are the fabric requirements to make the snowball quilted pillow cover.
- Fat quarters from various prints. I used:
- 1/3 yard for binding and blocks. I used Campfire Sweets
- 1/ 4 yard for borders and blocks. I used Lunation Bright
- Fat quarter for snowball corners. I used Connect the Stars
- 1 yard of fabric for pillow back & quilting the front.

Cutting Directions
- To create the blocks you will need:
- Cut 16 – 5 inch squares: 2 each from Fireflies Glow, Sneaky Little Foxes, Camping Stories, Lunation Bright. 4 each from Campfire Sweets, and Hopping Hare.
- 64 – 1 1/2 inch squares from Connect the Stars
- To complete the pillow you will need:
- 4 – 2 inch x 22 inch border strips for the borders
- 24 inch square of solid for the quilt backing
- 24 inch square of batting
- 2 – 20 inch x 13 inch rectangles for the envelope pillow back
Directions to make pillow
Step 1: Sew 16 snowball blocks
Sew 1 1/2 inch squares to each of the 4 corners of your 5 inch squares.

Trim away the corers leaving 1/4″ seam, and press seam towards the dark fabric.

Step 2: Sew blocks together to form an 18 1/2 inch square
Starting with the top row, sew your blocks together with right sides together. After you’ve sewn your blocks in the row together, sew your rows.

When sewing rows together, it’s helpful to pin them together at the seams so they nest together nicely. Lots of pinning helps at this stage for nice accurate points.

Trim your block to straighten up the edges. Mine measures 18 1/2″ square.

Step 3: Add borders
Next, sew borders all around. I took a 2 inch strip of 44 inch wide Lunation and sewed it to to the top of my pillow blocks, then trimmed off leftovers. Do the same to the bottom. After the top and bottom borders are sewn on, attach your sides in the same manner. I used a second strip of 2 x44 border.

Step 4: Quilt the pillow front
Once your borders are in place, and pressed nicely. It’s time to build the quilt sandwich.
Take the 24 x 24 inch piece of pressed, white cotton fabric (this will not show in your final pillow) and lay it on a pin friendly table (something not too precious because it could get scratched – I pin on my cutting mat).
Next lay your 24 x24 inch piece of cotton batting on top of white fabric. Smooth out any wrinkles.
Then, lay your pieced pillow top over the batting, and smooth it out. Now you are ready for pin basting.

My favorite tool to use when pin basting is the Kwik Klip tool tool, this handy tool saves my fingers from pain, when I have a lot of basting to do. But I use it all the time for quilt projects of any size.

Here’s the tool in use, pardon the bright photo on my seamstress hardworking hands!

Pin away!
I pin about a hand width apart all over the quilt top, because I don’t want it to shift around on me when doing my machine quilting.

After the basting is done, it’s time to sew. I use a walking foot, along with Aurifil 50 wt thread for both my top and bobbin thread.

Straight line quilting is my preferred method for my small home sewing machine. In order to keep rows straight and even, I use the edge of my walking foot as my guide. With this method, the rows are 1/2 inch apart. If you prefer not to quilt this densely, follow the directions from your quilt batting manufacturer for spacing requirements.


After you’ve finished quilting, trim off the excess batting and backing. Trim to fit your pillow form. My pillow form is 20 inches, so I trimmed it to 20 inches square.

Step 5: Make envelope style pillow back
Now you’re ready to assemble your pillow. Almost done!
Cut 2 – 20″ x 13″ pillow back pieces, if you haven’t done so already. I am using this white cotton from Cloud 9.

Fold one side of each long edge under 1/2″ and press, fold under again.

Pin the pillow back pieces right side up to the wrong side of the quilted pillow top. Be sure to check this twice, you should see the nice front of your pillow when you flip it over. This is because we will be finishing the raw edges with binding, rather than the traditional sew inside out and flip method.

Sew a 1/8″ stay sitch all the way around the perimeter, remove pins as you go. This will keep your pillow from shifting while you sew on your binding.


Step 6: Sew binding on pillow to finish
The final step is to sew binding onto your pillow. Here we go!
Cut 3 binding strips 2 1/4″ wide by the width of the fabric (WOF), giving you approximately 132″ of binding, which is plenty for this pillow because you need 80 inches to go around the perimeter, plus 12 at least for good measure. You’ll thank me later.

Sew your 3 binding strips together on the diagonal as shown.

Sew all your strips together, then trim away excess.


Now that you have your binding strips sewn together, give them a good press. Press the seams open to reduce bulk. Then press the entire length of binding in half with wrong sides together.

Sew your binding to your pillow top, with wrong side facing up, aligning the raw edges. Be sure to leave a tail for joining your strips together at the very end, a good 6 inches will do. Start sewing in the center of one of your pillow sides, you don’t want your binding to end at a corner, because that would be difficult for the finishing step.


When you reach a corner, be sure to stop 1/4″ from the end. Take your pillow out from under the presser foot, fold up the binding as shown, then fold back down, aligning the edges. This will give you a nice mitered corner. It’s easier to show then to explain, so here’s a few more photos (as if this post doesn’t have enough already, ha!)


Here’s another little tip. When you get close to the corner, use a seam gauge to ensure you’re 1/4″ away from the end. It’s also useful to hold down the binding so you can see clearly where the end is.

Continue sewing around your pillow top. Stop sewing 10 inches from where you started – leaving yourself enough room to join the binding ends together.
There are a few ways to finish your binding, but this method is what I find to be the easiest.
Be sure to leave lots of room between the ends of where you started and stopped sewing on your binding (10″ or so).

Fold the edges where they meet up as shown below – you will be cutting off the excess after you sew the two ends together.
Finger press this fold line, and mark the right sides of the fabric along the fold line with an Erasable marking pen.

Sew with right sides together along this marked line.

Here are my ends sewn together.

Trim off the excess fabric, and give it a good press.

What’s important is that you sew the strips with right sides together, at the point where the nest up nicely as shown above.

And for the final step, it’s time to fold the binding over to the front, clip it into place and sew.

Binding clips make this step so easy. Whether you want to hand sew, or machine sew your binding clipping the binding in place makes this a breeze.


Using your walking foot, sew close to the edge of your binding, about an 1/8″ away.

When you reach the corner, it can be difficult to hold those pretty mitered corners in place, use a pin as shown below to hold them down. Stop with your needle down when your ready to turn. Lift your presser foot, turn the pillow. Put the presser foot back down and keep on going.


There you have it, you’re finished!


Enjoy your new pillow.
For more sewing tips, and projects be sure to join my email newsletter.